Migrate RDS SQL Server database to Custom RDS SQL Server


aws kms create-key
1. Create symmetric KMS key for Custom RDS
aws iam create-role \
— role-name AWSRDSCustomSQLServerInstanceRole \
— assume-role-policy-document ‘{
“Version”: “2012–10–17”,
“Statement”: [
{
“Action”: “sts:AssumeRole”,
“Effect”: “Allow”,
“Principal”: {
“Service”: “ec2.amazonaws.com”
}
}
]
}’
3. Add below policy to above role.
Update region, account_id and KMS key ARN in below policy
aws iam put-role-policy \
--role-name AWSRDSCustomSQLServerInstanceRole \
--policy-name AWSRDSCustomSQLServerIamRolePolicy \
--policy-document '{
"Version": "2012-10-17",
"Statement": [
{
"Sid": "ssmAgent1",
"Effect": "Allow",
"Action": [
"ssm:GetDeployablePatchSnapshotForInstance",
"ssm:ListAssociations",
"ssm:PutInventory",
"ssm:PutConfigurePackageResult",
"ssm:UpdateInstanceInformation",
"ssm:GetManifest"
],
"Resource": "*"
},
{
"Sid": "ssmAgent2",
"Effect": "Allow",
"Action": [
"ssm:ListInstanceAssociations",
"ssm:PutComplianceItems",
"ssm:UpdateAssociationStatus",
"ssm:DescribeAssociation",
"ssm:UpdateInstanceAssociationStatus"
],
"Resource": "arn:aws:ec2:<region>:<accound_id>:instance/*",
"Condition": {
"StringLike": {
"aws:ResourceTag/AWSRDSCustom": "custom-sqlserver"
}
}
},
{
"Sid": "ssmAgent3",
"Effect": "Allow",
"Action": [
"ssm:UpdateAssociationStatus",
"ssm:DescribeAssociation",
"ssm:GetDocument",
"ssm:DescribeDocument"
],
"Resource": "arn:aws:ssm:*:*:document/*"
},
{
"Sid": "ssmAgent4",
"Effect": "Allow",
"Action": [
"ssmmessages:CreateControlChannel",
"ssmmessages:CreateDataChannel",
"ssmmessages:OpenControlChannel",
"ssmmessages:OpenDataChannel"
],
"Resource": "*"
},
{
"Sid": "ssmAgent5",
"Effect": "Allow",
"Action": [
"ec2messages:AcknowledgeMessage",
"ec2messages:DeleteMessage",
"ec2messages:FailMessage",
"ec2messages:GetEndpoint",
"ec2messages:GetMessages",
"ec2messages:SendReply"
],
"Resource": "*"
},
{
"Sid": "ssmAgent6",
"Effect": "Allow",
"Action": [
"ssm:GetParameters",
"ssm:GetParameter"
],
"Resource": "arn:aws:ssm:*:*:parameter/*"
},
{
"Sid": "ssmAgent7",
"Effect": "Allow",
"Action": [
"ssm:UpdateInstanceAssociationStatus",
"ssm:DescribeAssociation"
],
"Resource": "arn:aws:ssm:*:*:association/*"
},
{
"Sid": "eccSnapshot1",
"Effect": "Allow",
"Action": "ec2:CreateSnapshot",
"Resource": [
"arn:aws:ec2:<region>:<accound_id>:volume/*"
],
"Condition": {
"StringLike": {
"aws:ResourceTag/AWSRDSCustom": "custom-sqlserver"
}
}
},
{
"Sid": "eccSnapshot2",
"Effect": "Allow",
"Action": "ec2:CreateSnapshot",
"Resource": [
"arn:aws:ec2:<region>::snapshot/*"
],
"Condition": {
"StringLike": {
"aws:RequestTag/AWSRDSCustom": "custom-sqlserver"
}
}
},
{
"Sid": "eccCreateTag",
"Effect": "Allow",
"Action": "ec2:CreateTags",
"Resource": "*",
"Condition": {
"StringLike": {
"aws:RequestTag/AWSRDSCustom": "custom-sqlserver",
"ec2:CreateAction": [
"CreateSnapshot"
]
}
}
},
{
"Sid": "s3BucketAccess",
"Effect": "Allow",
"Action": [
"s3:putObject",
"s3:getObject",
"s3:getObjectVersion",
"s3:AbortMultipartUpload"
],
"Resource": [
"arn:aws:s3:::do-not-delete-rds-custom-*/*"
]
},
{
"Sid": "customerKMSEncryption",
"Effect": "Allow",
"Action": [
"kms:Decrypt",
"kms:GenerateDataKey*"
],
"Resource": [
"arn:aws:kms:<region>:<accound_id>:key/xxxxxxx-xxxx-xxxx-xxxx-xxxxxxxxxxxxx"
]
},
{
"Sid": "readSecretsFromCP",
"Effect": "Allow",
"Action": [
"secretsmanager:GetSecretValue",
"secretsmanager:DescribeSecret"
],
"Resource": [
"arn:aws:secretsmanager:<region>:<accound_id>:secret:do-not-delete-rds-custom-*"
],
"Condition": {
"StringLike": {
"aws:ResourceTag/AWSRDSCustom": "custom-sqlserver"
}
}
},
{
"Sid": "publishCWMetrics",
"Effect": "Allow",
"Action": "cloudwatch:PutMetricData",
"Resource": "*",
"Condition": {
"StringEquals": {
"cloudwatch:namespace": "rdscustom/rds-custom-sqlserver-agent"
}
}
},
{
"Sid": "putEventsToEventBus",
"Effect": "Allow",
"Action": "events:PutEvents",
"Resource": "arn:aws:events:<region>:<accound_id>:event-bus/default"
},
{
"Sid": "cwlOperations1",
"Effect": "Allow",
"Action": [
"logs:PutRetentionPolicy",
"logs:PutLogEvents",
"logs:DescribeLogStreams",
"logs:CreateLogStream",
"logs:CreateLogGroup"
],
"Resource": "arn:aws:logs:<region>:<accound_id>:log-group:rds-custom-instance-*"
},
{
"Sid": "cwlOperations2",
"Effect": "Allow",
"Action": "logs:DescribeLogGroups",
"Resource": "arn:aws:logs:<region>:<accound_id>:log-group:*"
}
]
}'
4. Create Instance profile and add role to instance profile
aws iam create-instance-profile \
--instance-profile-name AWSRDSCustomSQLServerInstanceProfile
aws iam add-role-to-instance-profile \
--instance-profile-name AWSRDSCustomSQLServerInstanceProfile \
--role-name AWSRDSCustomSQLServerInstanceRole
Create Custom RDS for SQL Server:
Create new RDS database with Engine Microsoft SQL Server and management type with Amazon RDS Custom
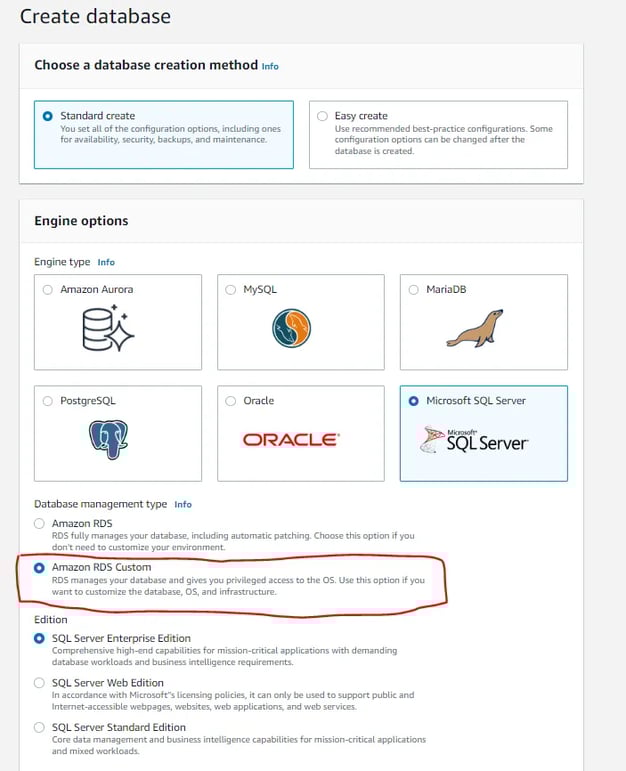
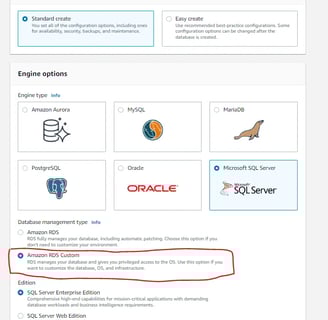
2. Provide all the other details as we mention for normal RDS like DB user, password, instance type, storage, security group, etc and also select KMS key, IAM Profile which we have created in perquisite steps. Refer Create custom SQL RDS
4. Take native backup of existing RDS SQL Server instance. To take native backup of RDS SQL Server instance, use below query
exec msdb.dbo.rds_backup_database
@source_db_name='<test_db>', @s3_arn_to_backup_to='arn:aws:s3:::<s3-bucket-name>/rds-native-backup/<test_db>.bak',
@overwrite_S3_backup_file=1;
To take native backup of existing server, we need to make few changes in option group. Please refer RDS SQL Server native backup
5. Follow below steps and Login EC2 instance which is associated with Custom RDS
a) Allow your IP in security group for RDP connection (port 3389)
b) Set the firewall rule on host. Start ssm session by executing below command
aws ssm start-session --target "<instance-id>"
Set-NetFirewallRule -DisplayName "Remote Desktop - User Mode (TCP-In)" -Direction Inbound -LocalAddress Any -Profile Any
c) Retrieve the secret key
In the details section of EC2 server, find key pair name and then check the secret in Secret Manager service with same key pair name. Retrieve the secret value. This server will be a Windows server. So you need to copy a pem file from secret and then generate a password from that pem file.
6. Once you logged into the server, copy the native backup files from s3 to this server. Open Microsoft SQL Server Management Studio and start to restore DB’s with below query. For more reference RDS SQL Server native backup restore
exec msdb.dbo.rds_restore_database
@restore_db_name='test_db',
@s3_arn_to_restore_from='C:\<path of db backup file>/test_db.bak';
2. Create IAM Role for Custom RDS SQL Server
Once the session is started, execute below command
3. The new custom RDS will be available in a few minutes. It will also create EC2 instance which is associated with Custom RDS.
Yajurveda Infotech is a leading provider of cloud services and DevOps solutions with over 10+ years of experience in delivering seamless, scalable, and secure Cloud infrastructures.
Contact us at
contact.yajurveda@gmail.com
+919904019843
© 2025. All rights reserved.
About Us

Godrej-24, Tower F1, Mulshi, Hinjewadi, Pune Haveli, Maharashtra, India - 411057